Thank you for visiting Bakatronics! Contact Us if you have any questions!
FK00 Help File
Details
Fun Kit Supplemental Instructions
Thank you for purchasing a Bakatronics “Fun Kit”. The instructions included with the kit were written (translated) overseas and be somewhat confusing to understand. However, the schematics and component layouts are very good and should be used along with these general instructions. The circuit boards are very well marked, and should make it easy to locate the components position on the board. Please note that these instructions are general for many kits, so even though a component may be mentioned, it may not be included in the kit you are assembling.
General Assembly Sequence & Instructions for Fun Kits:
- Open the package and remove the circuit board and the plastic bag with the components.
- Using the plastic front of the package as a tray, remove the components from the bag and put them in the tray
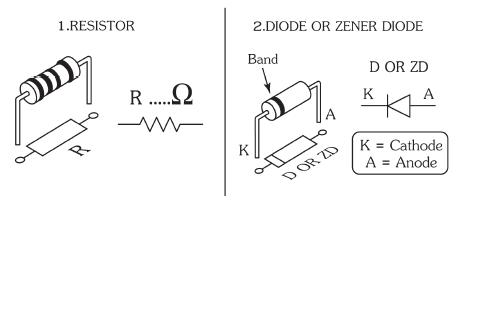
- Start by identifying the resistors (a magnifying glass helps) by using the color code on the back of the package and installing them into the board as shown on the package back. (also see resistor chart at end of this page)
- After checking that they are in the correct position, solder in place and trim the excess from the components leads.
- Identify, Install and solder diodes (if any are part of the kit). If not skip this step. Use care to make sure the direction of the diode matched the markings on the circuit board.
- Install the jumpers (if any) and solder. They look like a resistor with a single center stripe or can also be a short piece of wire.
- Install and solder any IC sockets that may be included, match the notches on the socket to the board. If none include skip to the next step.
- Install and solder the capacitors onto the board using care to make sure the positive lead is into the + hole. The longer leg of the capacitor is +. Trim leads
- Install Potentiometer(s) if any are in the kit. If not skip to next step
- Install Transistor(s) (if any) and solder to board. Use caution to correctly position the transistor on the circuit board and avoid excess heat when soldering.
- Install and solder LED(s) (if any) onto the board. Make sure the positive lead of the LED (longer lead) is installed into the Anode hole, see sketch on package back. A=Anode and K=cathode or the – (negative) lead. (Note: LEDs do not have to be fixed to the board and can be installed in a project using wires from the board to the LEDs. This way you can space them out or change the order of how they light up in your project.)
- Install and solder the terminal posts or an optional battery clip, making sure the positive and negative leads are correctly positioned.
- Carefully insert the IC Chip(s) (if any) into the sockets. Make sure the notch is the right direction. Some chips are static electricity sensitive, so ground yourself before touching the chip.
- Install any remaining components and solder into place.
- Connect to the required DC voltage and try the unit out.
Trouble Shooting if it does not work.
- Check to make sure you have the proper Voltage and Polarity
- Check all solder joints for “cold” solder joints or solder bridged connections.
- Check to make sure all the polarity of the components are installed correctly
- Check that the IC is correctly installed
- Check to make sure any LEDs are correctly installed.
We have sold and also assembled 100’s of these kits and have found that almost all problems will be related to the above items. It is very rare that a component or device is defective. If you have tried everything and cannot get it to work, you may return the kit, postage paid, to Bakatronics LLC for evaluation. Please include a diagnostic fee of $15.00 to cover the evaluation and return postage. If we find the kit to be defective we will replace it at no cost and refund the diagnostic fee.
Similar Products
Electronic Kits for fun, education and model building.
Flashing & Chasing Lighting and LED kits
Electronic kits and train accessories to make your railroads "come alive".
Categories
• Videos
BK Series Bakatronics Exclusives
FK Series Fun Kits
FK100 Series & BK Series LED & Lighting Kits
FK200 Series Sound Effects Kits
FK300 Series Telephone related Kits
FK400 Series Timers & Control Kits
FK500 Sensor & PIR Kits
FK600 Series Audio Related Kits
FK700 Series Radio & Transmitter Kits
FK800 Series Voltage & Speed Control Kits, PWM
FK900 Series General Interest Kits
FK1000 Series Solar Electronic Kits
FK1100 Series Robotic Kits
FK1200 Series Beginner Kits
FK1300 Series Sound Effects Kits
FB Series Project Enclosures & Boxes
LEDs For Trains & Models
Illuminator
Circuitron RR Devices (Closeouts)
Electronic Kits
• DCC